Saturday, 31 October 2015

Pumpkin Fritters Recipes

Happy Halloween to everyone. Today I thought I would share my recipe for Pumpkin Fritters 0 a very different kind of thing.

This is a South African thing - in my family we eat it with our main course, normally with chicken or lamb, even though the fritters are coated with sugar and cinnamon. Here in England I think that it would be preferred as a sweet dish. Either way, they are simply delicious, sort of like a pancake. At this time of year they are warming and wholesome, and so easy to make.


Recipe 

Ingredients 
500g of cooked pumpkin. (See my notes on how to cook the pumpkin)
200g plain flour
1 teaspoon of nutmeg
2 teaspoons of baking powder
A pinch of salt
1 teaspoon of soft brown sugar
1 egg
Sunflower oil for frying

For dusting
1 cup of granulated sugar
2 teaspoon of ground cinnamon

How to cook the pumpkin
I prefer to use butternut squash. Clean and peel the squash and scoop out the pips and stringy bits from the . (Did you know you can wash the pips and lay them on paper towel to dry.Then roast them in the oven at a high temp - say 200 deg C in the oven. Delicious.)
Cut the flesh into large clumps and steam in a colander or steamer until very soft. Allow to cool in the colander before using, so the excess liquid drains away.

Method 
In a mixer, add the cooled pumpkin mixture, the dry ingredients and lastly the egg. Mix well. You may need to add more flour or liquid - you need to get a thick, but sloppy mixture that is fairly smooth.

Mix the cinnamon and sugar together in a small bowl.

Heat a 5 mm layer of oil in a heavy frying pan. Test the oil with a small drop of the pumpkin mixture. If it starts fizzing, it is hot enough and ready for cooking.

Drop a heaped tablespoon of the mixture into the frying pan, using a smaller spoon to help get it off the larger spoon and flatten the mixture a bit. Drop more fritters into the oil until the pan is full. Keep the heat steady - cook for about 3 minutes on one side, before flipping and squashing the fritter flat.

Drain on paper towel and then drop into the cinnamon and sugar mixture and coat thoroughly.

Makes about 12 - 16 fritters.

Serve warm with slices of lemon. Be brave and try it with a savoury dish as one of your vegetables.

Enjoy and let me know how it tastes.


Labels: ,

Tuesday, 20 October 2015

Five Ways of Decorating with Crochet Doilies

I love to crochet - and I particularly love making thread doilies but I have noticed that there is a bit of a "shock-horror" look if I mention crochet - or even worse the doily! (Never mind the fact that I may actually be making one! Some of my friends cannot handle that I actually wrote a book on it.)

Crochet has made a big comeback in the last few years, and it is fresh and new and exciting. There is lots of colour and innovation in the way stitches and the construction is used.

When it comes to doilies I think there is a vision of old-fashioned fussiness which equates with clutter with doilies draped everywhere.

But they too have been maiking a big comeback - they can be seen used in clothing on the catwalk and the Internet is littered with stories of people making their wedding dresses with joined up doilies. I am never really too sure that is something I could wear, but I do use doilies in my house. I have also noticed that they are being used in many new and innovative ways in modern and trendy homes.

So here are some of the ways I see them being used.

1. On tables, and side tables


Let's start with the usual - a table with a centrepiece doily - very normal as the picture above shows.

And colour? I was commissioned to design this doily for a magazine - expressly in yellow (I did a lavender verions too). I kept the bright yellow doily and placed it on this small dark wood side table in my living room and it looks fab! (And believe me, I was not convinced about the colour at all but now I love it as it adds just that bit of punctuation to the room.)

If you fancy making this doily the pattern is available from my Ravelry store.

I am seeing lots of colour in doilies now - I only used to use white ones, but I am learning to be that bit braver.

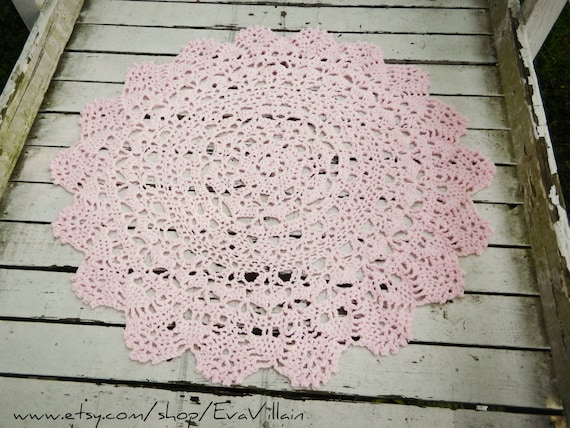
2.  Doily Rugs

I remember seeing these rugs in homes in the 1970s, and they are back big time, and if well made are a very serviceable item.

I love this one which is available on Etsy from EvaVillain - very cool. And a great image.


If you are buying one, check what it is made from. You want to be sure it is easy to wash and has suitable wearing qualities for where you want to use it. Also be careful about "slippiness" - you don't want the rug to be lethal. The stiffer it is the less likely it is to crumple, but it may "walk".

3. Doily Bowls

Now I am not too sure of this idea - for one main reason. To get the doily to keep its shape you have to use glue to get the final shape - I hate using glue on crochet - it almost always yellows with age, it does peel and if the bowl gets dirty - that's it for all the work that goes into it. Believe me, I love thread crochet, but it is slow work when you compare it to yarn made items. Some makers use sugar water solution to stiffen the doily. That does wash out, but the bowl is likely to go limp in high humidity. On the plus side they are really pretty and feminine - perhaps for soaps in a cloakroom? So while I doubt their practical use, decoratively they can be very stylish and add just the right accent to a setting.


This is simply made, but very striking lace crochet bowl from Linda Permann and the pattern is free on Ravelry.

4. Lightfitting

Now many people I have spoken to always express worry that the light bulb will burn the doilies - no it won't if you take some precautions - don't use a halogen light bulb - they simply get too hot. Really the best is long life, cool lights, but a tungsten bulb will also work. LED based light bulbs will be fine too.

Here is a great examples of taking several doilies and turning them into lamps:


I love the patterns of light all over the wall. Beautiful.

5. Wall Art

Simple and easy to do. Either make your own doilies, or collect vintage doilies from charity and thrift shops. Often old doilies are falling apart so you can cut away the broken bits and use them in art. I simply love this huge doily on a canvas. So effective and not difficult to do. I am going to have a go!

(Found here)


I also love the idea of using doilies as dreamcatchers (as seen on this image I found on Pinterest). Clever clever.


I will do a post on how to make some instant wall art soon, but in the meantime I hope you are inspired by this post.... perhaps even pick up a crochet hook and make your own.

You can find sellers of crochet on Etsy, or patterns on Ravelry.


Labels: ,

Tuesday, 6 October 2015

How to Make the Perfect Country Apple Pie

At this time of year there are apples everywhere you look. Roadside stalls groan under the weight of the fruit and the prices are simply silly. The area where I live has acres and acres of apple trees so it almost seems pointless growing them in your own garden, although I have to admit that I do have a small apple tree and there is an enormous basket of fruit waiting for cooking. There is something really pleasing about picking your own.

I bought 2 bags of apples from a stall along the road while out walking - I know, I know - I have apples, but these looked divine. One bag held the classic Bramley, the other bag had apples that were slightly pink fleshed - I think Albert Etter type - but not sure - my pie filling is a lovely colour.

Here is my recipe which in my mind is absolutely perfection. I don't add any sugar to the pie filling - so the finished result is very homely and tart.


The Filling 

Preparing the fruit for my apple pie means cooking it first. Bramley's have a tendency to foam to nothing if cooked for too long, while the other apples were a mystery, but they were extraordinarily pink inside - probably really an eating apple

  • You will need no more than 1.8kg of fresh apples, although the quantity you use will vary because of the core size, water content and so on. 
  • Peel, core and cut into large chunks. 
  • Steam the apples gently for about 10 minutes or until a fork just goes through them - I use a double steamer and do a small amount of fruit at a time else the fruit at the bottom dissolves while the fruit on the top is still firm. 
  • Set aside to cool while you make the pastry. 


Biscuit Pastry 

This recipe is derived from a family recipe. It is a soft, fall apart type of pastry that is light and a little bit spongy - almost cake like.

Ingredients 
240 g Flour
100 g Sugar
1 1/2 teaspoon Baking Powder
1/2 teaspoon Salt
100 g Butter, chilled and cut into chunks
2 Eggs


  • Preheat the oven to 220 deg C. 
  • Mix the dry ingredients together. 
  • Rub the butter into the dry ingredients until you have small flakes. 
  • Lightly beat the 2 eggs in a separate bowl and add to the mixture, mixing quickly and smoothly working the dough gently until it is smooth and even. It should be fairly soft and light. Do not over knead. Let the dough rest for about 10 minutes before using. 
Making The Pie
  • Place the dough onto a lightly floured board and roll out gently until about 4 - 5 mm thick. Don't worry if it breaks, you can patch it easily. 
  • Grease a deep pie dish 200 mm (8") wide and about 40 mm (1 1/2") deep with butter. Cover the dish almost entirely with the pastry, patching any breaks and holes - the pastry will want to fall apart. . 
  • Poke some holes, with a fork, in the base of the pastry and bake at 220 deg C  for 10 minutes. Turn the oven down to 200 deg C. 
  • Let the base rest for a few minutes before adding the filling. Cover the top of the pie with the remaining pastry and then stab with a fork until you have a rough chunky appearance. Crimp the edges of the pie. 
  • Bake in the oven for 15 minutes or until browned. Cover the pie with tin foil, turn the oven down to 170 deg C and bake for another 10 minutes. 
  • Let it cool slightly before serving with ice-cream or cream, or both! Enjoy.  


Labels: ,

Calico Living: October 2015

Calico Living